Configuration and Building
This section provides information about configuring and building the Axom software after you have cloned the repository. The main steps for using Axom are:
- Configure, build, and install third-party libraries (TPLs) on which Axom depends.
- Build and install Axom component libraries that you wish to use.
- Build and link your application with the Axom installation.
Depending on how your team uses Axom, some of these steps, such as installing the Axom TPLs and Axom itself, may need to be done only once. These installations can be shared across the team.
Requirements, Dependencies, and Supported Compilers
Basic requirements:
- C++ compiler with C++14 support at a minimum
- CMake with a minimum required version of 3.14 for CPU-only and CUDA builds, and a minimum version of 3.21 when building with HIP support
- Fortran Compiler (optional)
Supported Compilers
Axom supports a wide variety of compilers. Please see the file
axom/scripts/spack/configs/<platform>/compilers.yaml
for the current list of supported and tested compilers for the platforms we
test on.
External Dependencies
Axom has two types of dependencies:
- Libraries. These contain code that Axom must link against.
- Tools. These are executables that we use during code development; e.g. generate documentation, format code, etc.
Unless noted otherwise in the following discussion, Axom dependencies are optional.
Note
A typical Axom user need only understand how to enable Axom features and provide a valid installation path for each required library dependency for each enabled feature.
Library Dependencies
The following table lists:
- Axom external library dependencies and links to documentation for each library
- Which libraries are required or optional dependencies for Axom. While most Axom libraries are not required, they are required to access all capabilities of components listed.
- The CMake variable that must be set to the path of each library installation when configuring a build with the library
| Library | Dependent Components | Build system variable |
|---|---|---|
| Conduit | Required: Inlet, Sidre | CONDUIT_DIR |
| c2c | Optional: Quest | C2C_DIR |
| HDF5 | Optional: Sidre | HDF5_DIR |
| Lua | Optional: Inlet | LUA_DIR |
| MFEM | Optional: Primal, Quest, Sidre | MFEM_DIR |
| RAJA | Optional: Mint, Spin, Quest | RAJA_DIR |
| SCR | Optional: Sidre | SCR_DIR |
| Umpire | Optional: Core, Spin, Quest | UMPIRE_DIR |
Note that each library dependency has a corresponding build system variable
(with the suffix _DIR) to supply the path to the library’s installation
directory. For example, hdf5 has a corresponding variable HDF5_DIR.
Note
Optional c2c library is currently only available for configurations on LLNL clusters.
Tool Dependencies
The following table lists:
- Axom external tool dependencies, with links to documentation for each tool
- The purpose of each tool; i.e., how it is used in Axom development
- The CMake variable that must be set to the path of the tool installation to enable its use in Axom
| Tool | Purpose | Build System Variable |
|---|---|---|
| clangformat | Code Style Checks | CLANGFORMAT_EXECUTABLE |
| CppCheck | Static C/C++ code analysis | CPPCHECK_EXECUTABLE |
| Doxygen | Source Code Docs | DOXYGEN_EXECUTABLE |
| Lcov | Code Coverage Reports | LCOV_EXECUTABLE |
| Shroud | Multi-language binding generation | SHROUD_EXECUTABLE |
| Sphinx | User Docs | SPHINX_EXECUTABLE |
Each tool has a corresponding build system variable (with the suffix
_EXECUTABLE) to supply a path to the tool executable. For example,
sphinx has a corresponding build system variable SPHINX_EXECUTABLE.
Building and Installing Third-party Libraries
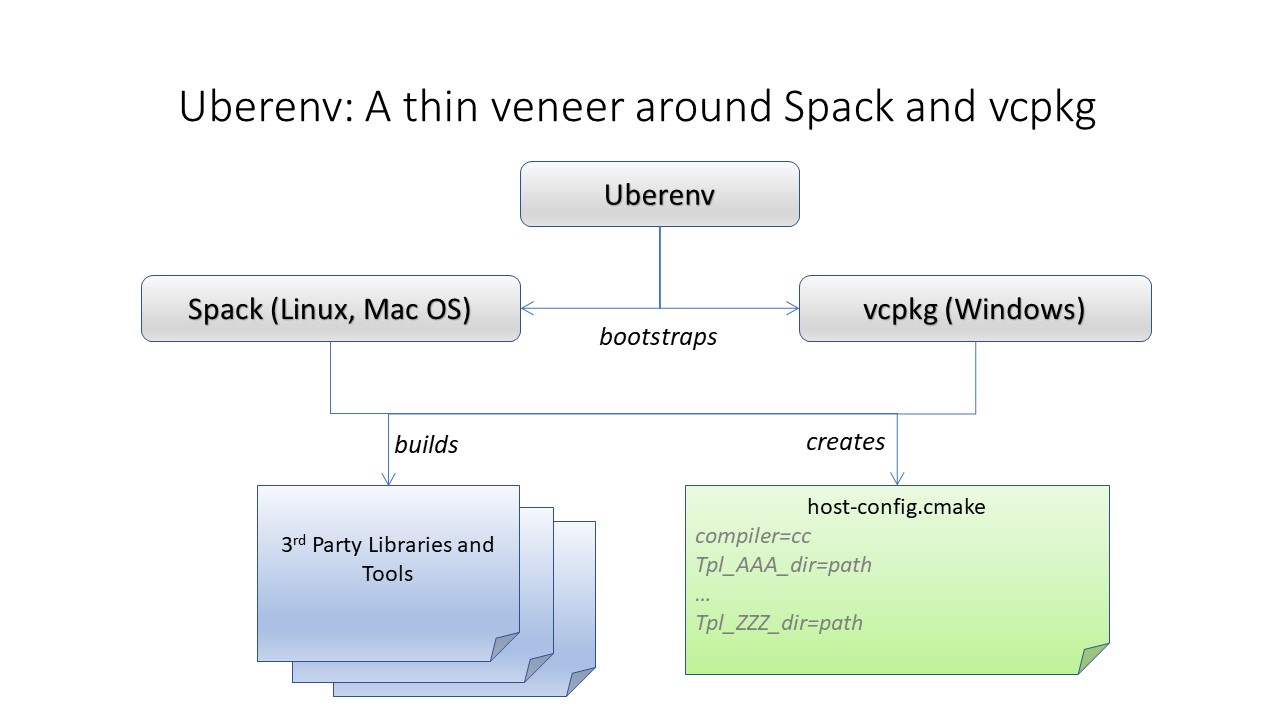
We use the Spack Package Manager to manage and build TPL dependencies for Axom on Linux and MacOS systems. Similarly, support for managing and building TPLs on Windows is provided through Vcpkg.
To make the TPL management process easier and automatic (you don’t really need
to learn much about Spack or Vcpkg), we drive it with a Python script called
uberenv.py, which is located in the scripts/uberenv directory.
Running this script on Linux or MacOS does several things:
- It clones the Spack repo from GitHub and checks out a specific version that we have tested.
- It configures Spack compiler sets, adds custom package build rules, and sets any options specific to Axom.
- It invokes Spack to build a complete set of TPLs for each configuration and generates a host-config file (i.e., CMake cache file) that includes all details of the configuration and build dependencies.
On Windows, uberenv.py takes analogous steps:
- It clones the vcpkg repo from GitHub.
- It specifies configuration details such as the “triplet,” specifying compiler, 64 vs 32-bits, and any other options specific to Axom.
- It sets up vcpkg and then invokes vcpkg to build a set of TPLs. It also generates a host-config file that includes configuration details and build dependencies.
The figure illustrates what the script does.
The uberenv script is run from the top-level Axom directory like this:
$ python ./scripts/uberenv/uberenv.py --prefix {install path}  \
                                      --spec spec              \
                                    [ --mirror {mirror path} ]
For more details about uberenv.py and the options it supports, please
see the uberenv docs
You can also see examples of how Spack spec names are passed to uberenv.py
in the Python scripts we use to build TPLs for Axom development on
LC platforms at LLNL. These scripts are located in the directory
scripts/llnl_scripts.
Note
To get a full list of all Axom dependencies in an uberenv
spack build of our TPLs, please go to the TPL root directory
and run the following Spack command: ./spack/bin/spack spec axom.
The analogous command for an uberenv vcpkg build is:
.\vcpkg depend-info axom.
Building and Installing Axom
This section provides essential instructions for building the Axom code.
Axom uses BLT, a CMake-based system, to configure and build the code. There are two ways to configure Axom:
- Using the helper Python script
config-build.py- Directly invoke CMake from the command line
Either way, we typically pass in many of the configuration options and variables using platform-specific host-config files.
Host-config files
Host-config files help make the Axom configuration process more automatic and
reproducible. A host-config file captures all build configuration
information used for a build, such as compiler version and options,
paths to all TPLs, etc. When passed to CMake
(via the -C path/to/hostconfig/file/foo.cmake option), the host-config file
initializes the CMake cache with the configuration contained in the file.
We noted earlier that the uberenv script generates a host-config file for each item in the Spack spec list given to it. These files are generated by Spack in the directory where the TPLs were installed. The name of each file contains information about the platform and spec.
For more information, see BLT host-config documentation.
Python helper script
The easiest way to configure Axom for compilation is to use the
config-build.py Python script located in the Axom top-level directory:
$ ./config-build.py -hc path/to/host-config/file/<host-config file name>
The script runs CMake and passes it the given host-config file. See Host-config files for more information.
Running the script, as above, will create two directories to hold the build and install contents for the platform and compiler with names that match the name of the host-config file.
To build the code and install the header files, libraries, and documentation
in the install directory, go into the build directory and run make and
make install:
$ cd {build directory}
$ make
$ make install
Caution
When building on LC systems, please don’t compile on login nodes. You will incur the wrath of others and you really don’t want that, do you?
Tip
Most make targets can be run in parallel by supplying the ‘-j’ flag along with the number of threads to use. For example:
$ make -j 8
runs make using 8 threads.
The Python helper script accepts other arguments that allow you to specify
explicitly the build and install paths and build type. Following CMake
conventions, we support three build types: Release, RelWithDebInfo, and
Debug. To see the script options, run the script without any arguments:
$ ./config-build.py
You can also pass extra CMake configuration variables to the script. For example:
$ ./config-build.py -hc path/to/host-config/<file name> \
                    -DBUILD_SHARED_LIBS=ON               \
                    -DENABLE_FORTRAN=OFF
This will configure CMake to build shared libraries and disable Fortran for the generated configuration.
Run CMake directly
You can also configure Axom by running CMake directly and passing it the appropriate arguments. For example, to configure, build and install a release build with the gcc compiler, you could pass a host-config file to CMake:
$ mkdir build-gcc-release
$ cd build-gcc-release
$ cmake -C {host config file for gcc compiler}           \
        -DCMAKE_BUILD_TYPE=Release                       \
        -DCMAKE_INSTALL_PREFIX=../install-gcc-release    \
        ../src/
$ make
$ make install
Alternatively, you could forego the host-config file entirely and pass all the arguments you need, including paths to third-party libraries, directly to CMake; for example:
$ mkdir build-gcc-release
$ cd build-gcc-release
$ cmake -DCMAKE_C_COMPILER={path to gcc compiler}        \
        -DCMAKE_CXX_COMPILER={path to g++ compiler}      \
        -DCMAKE_BUILD_TYPE=Release                       \
        -DCMAKE_INSTALL_PREFIX=../install-gcc-release    \
        -DCONDUIT_DIR={path/to/conduit/install}          \
        {many other args}                                \
        ../src/
$ make
$ make install
CMake Configuration Options
The tables in this section summarize the main build system options in Axom.
Axom components, tests, examples, etc.
| OPTION | Default | Description |
|---|---|---|
| AXOM_ENABLE_ALL_COMPONENTS | ON | Enable all components by default |
| AXOM_ENABLE_<FOO> | ON | Enable the Axom component named ‘Foo’ (e.g. AXOM_ENABLE_SIDRE) for the Sidre component. Overrides AXOM_ENABLE_ALL_COMPONENTS for the specified component. |
| AXOM_ENABLE_EXAMPLES | ON | Build Axom examples |
| AXOM_ENABLE_TESTS | ON | Build Axom unit tests |
| ENABLE_BENCHMARKS | OFF | Build Axom benchmarks |
| AXOM_ENABLE_DOCS | ON | Enable Axom documentation to be built as a make target |
| AXOM_ENABLE_TOOLS | ON | Enable Axom development tools |
If AXOM_ENABLE_ALL_COMPONENTS is OFF, you must explicitly enable a desired
component (other than ‘core’, which is always enabled). Similarly, if
AXOM_ENABLE_ALL_COMPONENTS is ON, you can disable individual components by
setting AXOM_ENABLE_<FOO> to OFF for the component you want turned off.
See Axom software documentation
for a list of Axom components and their dependencies. Note that when enabling
an external dependency for an Axom component, the CMake variable BAR_DIR
must be set to a valid path to the dependency installation. See
External Dependencies for a complete listing of configuration variables
to specify paths to Axom external dependencies.
Note
AXOM_ENABLE_EXAMPLES, AXOM_ENABLE_TESTS, and
AXOM_ENABLE_DOCS are CMake-dependent options. Thus, if a
variable without the AXOM_ prefix is ON, such as ENABLE_TESTS,
tests can be enabled in other packages in a project build and turned
off in Axom by setting the Axom prefix form AXOM_ENABLE_TESTS to
OFF.
Axom build options, compiler support, and parallelism
| OPTION | Default | Description |
|---|---|---|
| AXOM_DEBUG_DEFINE | DEFAULT | Controls whether the AXOM_DEBUG compiler define is enabled By DEFAULT, it is enabled for Debug and RelWithDebInfo configs but this can be overridden by setting AXOM_DEBUG_DEFINE to ON or OFF |
| ENABLE_ALL_WARNINGS | ON | Enable extra compiler warnings in all build targets |
| ENABLE_WARNINGS_AS_ERRORS | OFF | Compiler warnings treated as errors |
| BUILD_SHARED_LIBS | OFF | Build shared libraries. Default is Static libraries |
| ENABLE_FORTRAN | OFF | Enable Fortran compiler support |
| ENABLE_MPI | OFF | Enable MPI |
| ENABLE_OPENMP | OFF | Enable OpenMP |
| ENABLE_CUDA | OFF | Enable CUDA |
| ENABLE_HIP | OFF | Enable HIP |
Note that, in most Axom components, node-level parallelism features, enabled with OpenMP, CUDA (NVIDIA GPUs), and HIP (AMD GPUs), are implemented using RAJA. See External Dependencies for instructions to set the directory location of a RAJA installation. In addition, enabling such features may require additional build options to be provided, which are summarized in the following table.
| OPTION | Description |
|---|---|
| RAJA_DIR | RAJA installation directory as described in External Dependencies. RAJA must be built with support enabled for OpenMP, CUDA, or HIP to use features enabled by those parallel programming models in Axom. |
| CUDA_TOOLKIT_ROOT_DIR | Path to CUDA software stack installation |
| CMAKE_CUDA_COMPILER | Path to CUDA compiler (e.g. nvcc) |
| CMAKE_CUDA_ARCHITECTURES | Target architecture(s) for CUDA |
| HIP_ROOT_DIR | Path to HIP software stack installation |
| CMAKE_HIP_ARCHITECTURES | Target architecture(s) for HIP |
Note
To configure the version of the C++ standard, you can supply one of the following values for BLT_CXX_STD: ‘c++11’ or ‘c++14’. Axom requires at least ‘c++14’, the default value.
Tools and features primarily intended for developers
| OPTION | Default | Description |
|---|---|---|
| ENABLE_CODECOV | ON | Enable code coverage via gcov |
| AXOM_ENABLE_ANNOTATIONS | OFF | Enable source code annotations to facilitate performance evaluation |
| AXOM_QUEST_ENABLE_EXTRA_REGRESSION_TESTS | OFF | Enable an expanded set of tests for the Axom Quest component |
Axom source code macro constants
Axom developers, please note that Axom provides macro constants to control conditionally-compiled code based on which built-in and third-party libraries are being used and which Axom components are enabled. Please see Conditionally compiled code for more information.
Make targets
Our system provides a variety of make targets to build individual Axom components, documentation, run tests, examples, etc. After running CMake (using either the Python helper script or directly), you can see a listing of all available targets by passing ‘help’ to make; i.e.,:
$ make help
The name of each target should be sufficiently descriptive to indicate what the target does. For example, to run all tests and make sure the Axom components are built properly, execute the following command:
$ make test
Compiling and Linking with an Application
Please see Preparing Windows WSL/Ubuntu for Axom installation for examples of how to use Axom in your project.